Kubernetes Response Engine, Part 7: Falcosidekick + Cloud Functions
This blog post is part of a series of articles about how to create a
Kubernetesresponse engine withFalco,Falcosidekickand aFaaS.See other posts:
- Kubernetes Response Engine, Part 1 : Falcosidekick + Kubeless
- Kubernetes Response Engine, Part 2 : Falcosidekick + OpenFaas
- Kubernetes Response Engine, Part 3 : Falcosidekick + Knative
- Kubernetes Response Engine, Part 4 : Falcosidekick + Tekton
- Kubernetes Response Engine, Part 5 : Falcosidekick + Argo
- Kubernetes Response Engine, Part 6 : Falcosidekick + Cloud Run
Earlier in this series, we have seen how to use Argo, Tekton, and Knative to trigger a resource after getting input from Falcosidekick. Recently, Falcosidekick received a new output type support for Cloud Functions.
In this part, let us learn how we can use Falcosidekick and Cloud Functions to detect and delete a compromised pod.
We will not go through what Cloud Functions is in-depth, however, you can always find a good overview about it in the official documentation.
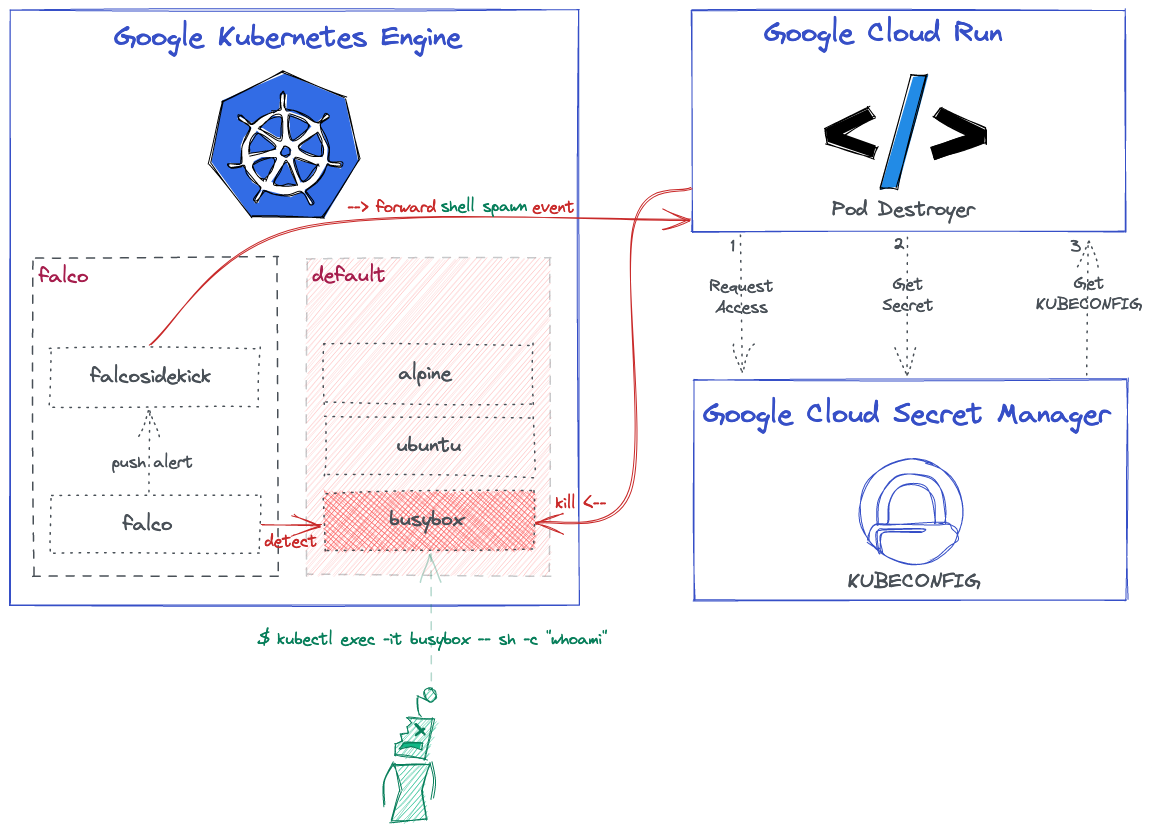
Here is the high-level overview architecture that shows what we want to achieve at the end of the day:
You can find all the related code and resources in this repository.
Prerequisites
- gcloud 342.0.0
- kubectl 1.20.5
Tutorial
Provision Google Kubernetes Engine (GKE) Cluster
As the blog title said already, we need to create a GKE cluster with workload identity enabled:
$ GOOGLE_PROJECT_ID=$(gcloud config get-value project)
$ CLUSTER_NAME=falco-falcosidekick-demo
$ gcloud container clusters create $CLUSTER_NAME --workload-pool ${GOOGLE_PROJECT_ID}.svc.id.goog
$ gcloud container clusters get-credentials $CLUSTER_NAME
Configure IAM Service Accounts
We need to create a new Service Account for target $GOOGLE_PROJECT_ID using IAM Binding policies to get access our Cloud Function:
$ SA_ACCOUNT=falco-falcosidekick-sa
$ gcloud iam service-accounts create $SA_ACCOUNT

$ gcloud projects add-iam-policy-binding ${GOOGLE_PROJECT_ID} \
--member="serviceAccount:${SA_ACCOUNT}@${GOOGLE_PROJECT_ID}.iam.gserviceaccount.com" \
--role="roles/cloudfunctions.developer"

$ gcloud projects add-iam-policy-binding ${GOOGLE_PROJECT_ID} \
--member="serviceAccount:${SA_ACCOUNT}@${GOOGLE_PROJECT_ID}.iam.gserviceaccount.com" \
--role="roles/cloudfunctions.invoker"
In the beginning, we already enabled WorkloadIdentity feature for our GKE Cluster by setting --workload-pool flag. What we need to do here is to add a iam.workloadIdentityUser role for the given Service Account.
$ gcloud iam service-accounts add-iam-policy-binding \
  --role roles/iam.workloadIdentityUser \
  --member "serviceAccount:${GOOGLE_PROJECT_ID}.svc.id.goog[${FALCO_NAMESPACE}/falco-falcosidekick]" \
  ${SA_ACCOUNT}@${GOOGLE_PROJECT_ID}.iam.gserviceaccount.com
We need to annotate the falco-falcosidekick resource. So it can grant access for our Cluster. Set up the Falcosidekick SA to impersonate a GCP SA:
$ kubectl annotate serviceaccount \
  --namespace $FALCO_NAMESPACE \
  falco-falcosidekick \
  iam.gke.io/gcp-service-account=${SA_ACCOUNT}@${GOOGLE_PROJECT_ID}.iam.gserviceaccount.com
Create Necessary Cluster Role
To limit function role access in the particular cluster, ensure that only SA has limited permissions within a particular namespace by using Role Bindings.
$ kubectl create serviceaccount pod-destroyer
$ kubectl create clusterrole pod-destroyer
  --verb=delete
  --resource=pod  # give only pod resource access for delete op
$ kubectl create clusterrolebinding pod-destroyer
  --clusterrole pod-destroyer
  --serviceaccount default:pod-destroyer
To obtain the Token from secret, we need to get pod-deleter ServiceAccount resource first:
$ POD_DESTROYER_TOKEN=$(kubectl get secrets $(kubectl get serviceaccounts pod-deleter -o json \
  | jq -r '.secrets[0].name') -o json \
  | jq -r '.data.token' \
  | base64 -D)
Add the pod-destroyer user to your KUBECONFIG:
# Generate your KUBECONFIG
$ kubectl config view  --minify --flatten > kubeconfig_pod-destroyer.yaml

# Set the token at the end of yaml
$ cat << EOF >> kubeconfig_pod-destroyer.yaml
users:
- name: user.name
  user:
    token: $POD_DESTROYER_TOKEN
We can test it with auth can-i to check if roles are set correctly
$ kubectl auth can-i list deployments  # no
$ kubectl auth can-i delete pod  # yes
$ kubectl access-matrix  # github.com/corneliusweig/rakkess
Create Secret Manager
The main reason Secret Manager get involved our architecture is because we had to find a way out to initialize our kubeclient in our function by getting pod-destroyer's KUBECONFIG.
We need to create a new secrets IAM policy for the SA member to enable Managing Secrets:
$ gcloud secrets add-iam-policy-binding pod-destroyer \
    --role roles/secretmanager.secretAccessor \
    --member serviceAccount:$SA_ACCOUNT@$GOOLE_PROJECT_ID.iam.gserviceaccount.com
Create a new secret, called pod-destroyer:
$ gcloud secrets create pod-destroyer --replication-policy="automatic"
Push the our generated kubeconfig_pod-destroyer.yaml file as a new version:
$ gcloud secrets versions add pod-destroyer --data-file=kubeconfig_pod-destroyer.yaml
Finally, we are ready to deploy our Cloud Run function!
Deploy Google Cloud Function
In this demonstration our function will simply delete the pwned Pod, as we already pointed it out in the architecture diagram.
- The Go code
package kill_the_pwned_pod

import (
  secretmanager "cloud.google.com/go/secretmanager/apiv1"
  "context"
  "encoding/json"
  "fmt"
  secretmanagerpb "google.golang.org/genproto/googleapis/cloud/secretmanager/v1"
  "io/ioutil"
  metaV1 "k8s.io/apimachinery/pkg/apis/meta/v1"
  "k8s.io/client-go/kubernetes"
  "k8s.io/client-go/tools/clientcmd"
  "net/http"
  "os"
  "time"
)

// Alert falco data structure
type Alert struct {
  Output       string    `json:"output"`
  Priority     string    `json:"priority"`
  Rule         string    `json:"rule"`
  Time         time.Time `json:"time"`
  OutputFields struct {
    ContainerID              string      `json:"container.id"`
    ContainerImageRepository interface{} `json:"container.image.repository"`
    ContainerImageTag        interface{} `json:"container.image.tag"`
    EvtTime                  int64       `json:"evt.time"`
    FdName                   string      `json:"fd.name"`
    K8SNsName                string      `json:"k8s.ns.name"`
    K8SPodName               string      `json:"k8s.pod.name"`
    ProcCmdline              string      `json:"proc.cmdline"`
  } `json:"output_fields"`
}

var op Operation

type Operation struct {
  clientSet *kubernetes.Clientset
}

// init initializes new Kubernetes ClientSet with given config
func init() {
  // The resource name of the KUBECONFIG_SECRET_NAME in the format
  // `projects/*/secrets/*/versions/*`
  resource := os.Getenv("KUBECONFIG_SECRET_NAME")
  if len(resource) == 0 {
    panic(fmt.Errorf("$KUBECONFIG_SECRET_NAME env variable did not set"))
  }

  secret, err := GetSecret(resource)
  if err != nil {
    panic(fmt.Errorf("get secret: %q", err))
  }

  kubeCfg, err := clientcmd.NewClientConfigFromBytes(secret)
  if err != nil {
    panic(fmt.Errorf("new client config: %q", err))
  }

  restCfg, err := kubeCfg.ClientConfig()
  if err != nil {
    panic(fmt.Errorf("client config: %q", err))
  }

  cs, err := kubernetes.NewForConfig(restCfg)
  if err != nil {
    panic(fmt.Errorf("unable to initialize config: %q", err))
  }

  op = Operation{clientSet: cs}
}

// KillThePwnedPod will executed for each Falco event
func KillThePwnedPod(w http.ResponseWriter, r *http.Request) {
  body, err := ioutil.ReadAll(r.Body)
  if err != nil {
    http.Error(w, "cannot read body", http.StatusBadRequest)
    return
  }

  var event Alert

  err = json.Unmarshal(body, &event)
  if err != nil {
    http.Error(w, "cannot parse body", http.StatusBadRequest)
    return
  }

  err = op.PodDestroy(event.OutputFields.K8SPodName, event.OutputFields.K8SNsName)
  if err != nil {
    http.Error(w, fmt.Sprintf("cannot delete pod: %q", err), http.StatusInternalServerError)
    return
  }

  w.WriteHeader(http.StatusOK)
}

// PodDestroy destroys the given pod name in the given namespace
func (d *Operation) PodDestroy(name, namespace string) error {
  err := d.clientSet.CoreV1().Pods(namespace).Delete(context.TODO(), name, metaV1.DeleteOptions{})
  if err != nil {
    return fmt.Errorf("unable to delete pod %s: %q", name, err)
  }
  return nil
}

// GetSecret returns the secret data.
func GetSecret(name string) ([]byte, error) {
  ctx := context.Background()

  client, err := secretmanager.NewClient(ctx)
  if err != nil {
    return nil, fmt.Errorf("failed to create secretmanager client: %v", err)
  }
  defer client.Close()

  result, err := client.AccessSecretVersion(ctx, &secretmanagerpb.AccessSecretVersionRequest{
    Name: name,
  })

  if err != nil {
    return nil, fmt.Errorf("failed to access secret version: %v", err)
  }

  return result.Payload.Data, nil
}
If you rather see it in GitHub.
$ git clone https://github.com/Dentrax/k8s-response-engine-gke-functions.git
$ cd kubernetes-response-engine-based-on-gke-and-gcloudfunctions
...
We need to pass extra --service-account flag in order to get access to Secret Manager.
Deploy the function:
$ FUNCTION_NAME=KillThePwnedPod
$ gcloud functions deploy $FUNCTION_NAME \
--runtime go113 --trigger-http \
--service-account $SA_ACCOUNT@$GOOLE_PROJECT_ID.iam.gserviceaccount.com
Allow unauthenticated invocations of new function [KillThePwnedPod]? (y/N)? N
...
Now, get the name of the function:
$ CLOUD_FUNCTION_NAME=$(gcloud functions describe --format=json $FUNCTION_NAME | jq -r '.name')
Install Falco + Falcosidekick
It is time to install Falco, Falcosidekick with Cloud Function output type enabled:
$ export FALCO_NAMESPACE=falco
$ kubectl create namespace $FALCO_NAMESPACE
$ helm upgrade --install falco falcosecurity/falco \
--namespace $FALCO_NAMESPACE \
--set ebpf.enabled=true \
--set falcosidekick.enabled=true \
--set falcosidekick.config.gcp.cloudfunctions.name=${CLOUD_FUNCTION_NAME} \
--set falcosidekick.webui.enabled=true
Test
Try to run a busybox image and execute a command:
$ kubectl run busybox --image=busybox --restart='Never' -- sh -c "sleep 600"
Try to exec into:
$ kubectl exec -it busybox -- sh -c "uptime"
We can check the logs of the Falco, and Falcosidekick to see what happened:
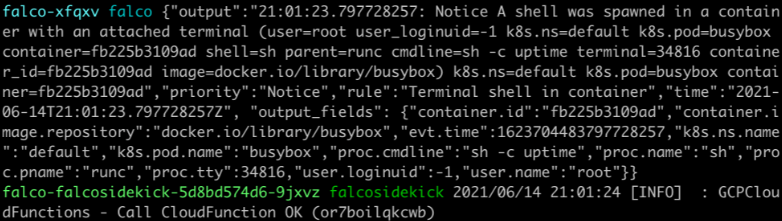
For Falcosidekick:
$ kubectl logs deployment/falco-falcosidekick --namespace falco
2021/06/14 21:01:24 [INFO]  : GCPCloudFunctions - Call Cloud Function OK
..
Conclusion
We got another way to create a Response Engine with amazing pieces of software from Open Source world. Of course, it's just the beginning, feel free to share your functions and workflows with the community for starting the creation of a true library of remediation methods.
If you would like to find out more about Falco:
- Get started in Falco.org.
- Check out the Falco project in GitHub.
- Get involved in the Falco community.
- Meet the maintainers on the Falco Slack.
- Follow @falco_org on Twitter.
