Install on a host (DEB, RPM)
Falco consumes streams of events and evaluates them against a set of security rules to detect abnormal behavior. By default, Falco is preconfigured to consume events from the Linux Kernel. This scenario requires Falco to be privileged, and depending on the kernel version installed on the host, a driver needs to be installed.
For other installation scenarios, such as consuming cloud events or other data sources using plugins, please refer to the Plugins section.
There are two main methods to install Falco on your host using the released Falco packages:
- RPM or DEB package (includes Systemd setup): This method is detailed on this page.
- Tarball archive: For instructions, refer to the Install on a host (tarball) page.
Install
This installation method is for Linux distributions with a package manager that supports DEB (Debian, Ubuntu) or RPM (CentOS, RHEL, Fedora, Amazon Linux) packages.
In interactive installations, the Falco installation package uses the dialog binary for configuration prompts. The dialog allows the user to complete the Systemd setup which includes:
- The driver selection (kmod, ebpf, modern_ebpf) or automatic selection
- The Falcoctl service setup
In non-interactive installations (e.g., dialog is not available, or if the user disables it by setting FALCO_FRONTEND=noninteractive when installing Falco using the package manager), the automatic driver selection is enabled by default and for other options, the user needs to manually configure the Systemd services.
Env variables
The following environment variables can be used to customize the installation process:
FALCO_FRONTEND: Set tononinteractiveto disable the dialog prompts. The default isdialog.FALCO_DRIVER_CHOICE: Set tokmod,ebpf, ormodern_ebpfto choose a driver; set tononeto disable service installation. If one of the previous option is selected, the dialog will be skipped too. The default (empty) is automatic selection.FALCOCTL_ENABLED: Set tonoto disable the automatic rules update provided byfalcoctl. The default (empty) or any value other thannowill keep the option enabled.
These environment variables can be used in conjunction with the package manager (as described in the following sections) to customize the installation process as needed.
Examples:
No dialog, no driver, no automatic rules update:
FALCO_DRIVER_CHOICE=none apt-get install -y falcoInstall with
kmoddriver and automatic rules update:FALCO_DRIVER_CHOICE=kmod apt-get install -y falcoNo dialog, automatic selection and automatic rules update:
FALCO_FRONTEND=noninteractive apt-get install -y falcoNo dialog, automatic selection and no automatic rules update:
FALCO_FRONTEND=noninteractive FALCOCTL_ENABLED=no apt-get install -y falco
apt (Debian/Ubuntu)
The following steps are for Debian and Debian-based distributions, such as Ubuntu, which use the apt package manager.
Trust the
falcosecurityGPG keycurl -fsSL https://falco.org/repo/falcosecurity-packages.asc | \ sudo gpg --dearmor -o /usr/share/keyrings/falco-archive-keyring.gpgConfigure the apt repository
echo "deb [signed-by=/usr/share/keyrings/falco-archive-keyring.gpg] https://download.falco.org/packages/deb stable main" | \
sudo tee -a /etc/apt/sources.list.d/falcosecurity.list
In older releases of Debian (Debian 9 and older ones), you might need to additionally install the package apt-transport-https to allow access to the Falco repository using the https protocol.
The following command will install that package on your system:
sudo apt-get install apt-transport-https
Update the package list
sudo apt-get update -yInstall some required dependencies that are needed to build the Kernel Module and the eBPF probe
Note: You don't need to install these dependencies if you want to use the Modern eBPF.
sudo apt install -y dkms make linux-headers-$(uname -r)
# If you use falcoctl driver loader to build the eBPF probe locally you need also clang toolchain
sudo apt install -y clang llvm
# You can install also the dialog package if you want it
sudo apt install -y dialog
Install the Falco package
sudo apt-get install -y falco
yum (CentOS/RHEL/Fedora/Amazon Linux)
Trust the
falcosecurityGPG keyrpm --import https://falco.org/repo/falcosecurity-packages.ascConfigure the
yumrepositorycurl -s -o /etc/yum.repos.d/falcosecurity.repo https://falco.org/repo/falcosecurity-rpm.repoUpdate the package list
yum update -yInstall some required dependencies that are needed to build the Kernel Module and the eBPF probe
Note: You don't need to install these dependencies if you want to use the Modern eBPF.
# If necessary install it using: `yum install epel-release` (or `amazon-linux-extras install epel` in case of amzn2), then `yum install make dkms`.
yum install -y dkms make
# If the package was not found by the below command, you might need to run `yum distro-sync` in order to fix it. Rebooting the system may be required.
yum install -y kernel-devel-$(uname -r)
# If you use falcoctl driver loader to build the eBPF probe locally you need also clang toolchain
yum install -y clang llvm
# You can install also the dialog package if you want it
yum install -y dialog
Install the Falco package
yum install -y falco
You might need to validate the driver signature if your system has UEFI SecureBoot enabled. Follow these steps to do so:
Import the DKMS Machine Owner Key
 ```shell
 sudo mokutil --import /var/lib/dkms/mok.pub
 ```
Restart the system and wait for the MOK key enrollment prompt
Choose the option:
Enroll MOKLoad the Falco driver
    ```shell
    sudo insmod /var/lib/dkms/falco/<driver-version>/$(uname -r)/x86_64/module/falco.ko.xz
    ```
zypper (openSUSE)
Trust the
falcosecurityGPG keyrpm --import https://falco.org/repo/falcosecurity-packages.ascConfigure the zypper repository
curl -s -o /etc/zypp/repos.d/falcosecurity.repo https://falco.org/repo/falcosecurity-rpm.repoUpdate the package list
zypper -n updateInstall some required dependencies that are needed to build the Kernel Module and the eBPF probe
Note: You don't need to install these dependencies if you want to use the Modern eBPF.
zypper -n install dkms make
# If the package was not found by the below command, you might need to run `zypper -n dist-upgrade` in order to fix it. Rebooting the system may be required.
zypper -n install kernel-default-devel-$(uname -r | sed s/\-default//g)
# If you use falcoctl driver loader to build the eBPF probe locally you need also clang toolchain
zypper -n install clang llvm
# You can install also the dialog package if you want it
zypper -n install dialog
Install Falco:
zypper -n install falcoUninstall Falco:
zypper rm falco
Systemd setup
Setup with dialog
By default, if you have the dialog binary installed on your system, you will be prompted with this:
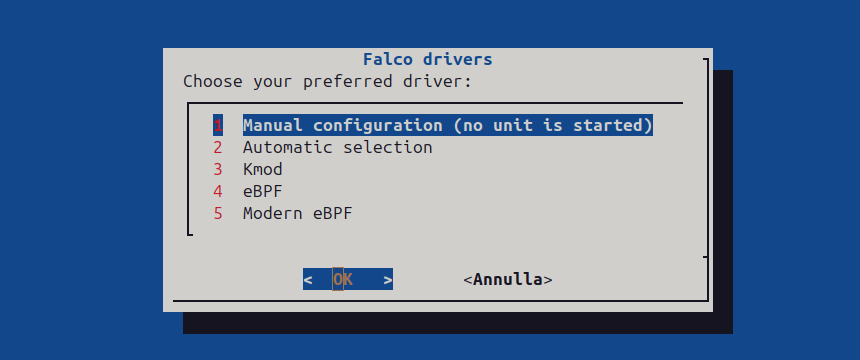
From here you can choose one of our 3 drivers Kmod, eBPF, Modern eBPF, a Manual configuration or the Automatic selection (recommended) to trigger the automatic logic to select the best driver for you. When you choose a driver from the dialog, the systemd service is always enabled by default so it will start at every system reboot. If you want to disable this behavior type systemctl disable falco-kmod.service (if you are using the kernel module like in this example).
After the first dialog, you should see a second one:

If you choose Yes, falcoctl will periodically check for ruleset updates and, if a new update is available, will pull
and install it.
Manual configuration
If you chose Manual configuration from the dialog, you need to complete the setup configuration.
First, let's verify the available services:
$ sudo systemctl list-unit-files "falco*"

UNIT FILE                        STATE    VENDOR PRESET
falco-bpf.service                disabled enabled
falco-custom.service             disabled enabled
falco-kmod-inject.service        static   enabled
falco-kmod.service               disabled enabled
falco-modern-bpf.service         disabled enabled
falcoctl-artifact-follow.service disabled enabled
Using the systemctl command, you can now enable the desired unit to start at boot time.
Let's say you want to enable the modern eBPF probe:
$ sudo systemctl enable falco-modern-bpf.service
Created symlink /etc/systemd/system/multi-user.target.wants/falco-modern-bpf.service → /lib/systemd/system/falco-modern-bpf.service.

$ sudo systemctl list-unit-files "falco*"

UNIT FILE                        STATE    VENDOR PRESET
falco-bpf.service                disabled enabled
falco-custom.service             disabled enabled
falco-kmod-inject.service        static   enabled
falco-kmod.service               disabled enabled
falco-modern-bpf.service         enabled  enabled
falcoctl-artifact-follow.service disabled enabled
Or you'd like to switch to using the kernel module:
$ sudo systemctl disable falco-modern-bpf.service
Removed /etc/systemd/system/multi-user.target.wants/falco-modern-bpf.service.

$ sudo systemctl enable falco-kmod.service
Created symlink /etc/systemd/system/falco.service → /lib/systemd/system/falco-kmod.service.
Created symlink /etc/systemd/system/multi-user.target.wants/falco-kmod.service → /lib/systemd/system/falco-kmod.service.

$ sudo systemctl list-unit-files "falco*"

UNIT FILE                        STATE    VENDOR PRESET
falco-bpf.service                disabled enabled
falco-custom.service             disabled enabled
falco-kmod-inject.service        static   enabled
falco-kmod.service               enabled  enabled
falco-modern-bpf.service         disabled enabled
falco.service                    enabled  enabled
falcoctl-artifact-follow.service disabled enabled

7 unit files listed.
Be aware that enabling the falco-kmod.service also creates a new alias/service called falco.service for compatibility reasons.
As a side note, if you prefer not to use the falcoctl tool to automatically update your rules, you can mask it as follows. Otherwise, as explained here, Falco will enable it too.
$ sudo systemctl mask falcoctl-artifact-follow.service
Created symlink /etc/systemd/system/falcoctl-artifact-follow.service → /dev/null.
Configuring services
If you installed the Falco packages using the dialog option, all your services should already be up and running. However, if you chose the Manual configuration option, you need to configure the services manually.
If you need to switch from one service to another, ensure that the current service is properly stopped before starting the new one. This can be done by using the appropriate service management commands for your system (e.g., systemctl stop <service_name> and systemctl start <new_service_name>).
For example, if you want to use the service for the eBPF probe:
Type
systemctl list-units | grep falcoto check that no unit is running. Stop the current services, if any.Now you have to decide whether you want the Falcoctl service running together with the Falco one. If yes you don't have to do anything, else you will need to mask the Falcoctl service with
systemctl mask falcoctl-artifact-follow.service. The Falcoctl service is strictly related to the Falco one so if you don't mask it, it will be started together with the Falco service.Type
falcoctl driver config --type ebpfto configure Falco to use eBPF probe, thenfalcoctl driver installto download/compile the eBPF probe.Now running
systemctl start falco-bpf.serviceand typingsystemctl list-units | grep falcoyou should see something like that (supposing you didn't mask the Falcoctl service):falco-bpf.service loaded active running Falco: Container Native Runtime Security with ebpf falcoctl-artifact-follow.service loaded active running Falcoctl Artifact Follow: automatic artifacts update serviceIf you want to stop both services in one shot
systemctl stop falco-bpf.service
Falcoctl service (automatic rules update)
If this service is enabled (as default), typing systemctl list-units | grep falco you should see something similar to this:
falco-kmod-inject.service                         loaded active exited    Falco: Container Native Runtime Security with kmod, inject.
falco-kmod.service                                loaded active running   Falco: Container Native Runtime Security with kmod
falcoctl-artifact-follow.service                  loaded active running   Falcoctl Artifact Follow: automatic artifacts update service
falco-kmod-inject.serviceinjects the kernel module and exits. This unit remains after exit to detach the kernel module when thefalco-kmod.servicewill be stopped.falco-kmod.serviceinstance of Falco running the kernel module. Since the kernel module is the default Falco driver, you can also use thefalcoalias to start/stop it once enabled.falcoctl-artifact-follow.serviceinstance of Falcoctl that searches for new rulesets. This unit will be stopped whenfalco-kmod.serviceterminates.
The Falcoctl service is strictly related to the Falco one:
- when the Falco service starts it searches for a unit called
falcoctl-artifact-follow.serviceand if present it starts it. Please note that following this pattern, if you enable the Falco service and you reboot your system, Falcoctl will start again with Falco even if you don't enable it throughsystemd enable! You can disable this behavior by stopping the Falcoctl service and masking itsystemctl mask falcoctl-artifact-follow.service. - when the Falco service stops also the Falcoctl service is stopped.
In case the Falcoctl service is not enabled, the Falco package will only start the falco-kmod.service. Typing systemctl list-units | grep falco you should see something similar to this:
falco-kmod-inject.service                         loaded active exited    Falco: Container Native Runtime Security with kmod, inject.
falco-kmod.service                                loaded active running   Falco: Container Native Runtime Security with kmod
In this mode, the Falcoctl service is masked by default so if you want to enable it in a second step you need to type systemctl unmask falcoctl-artifact-follow.service.
Custom service
You may have noticed a Falco unit called falco-custom.service. You should use it when you want to run Falco with a custom configuration like a plugin or Gvisor. Please note that in this case you have to modify this template according to how you want to run Falco, the unit should not be used as is!
Configuration
The Falco configuration file is located at /etc/falco/falco.yaml. You can edit it to customize Falco's behavior.
Since Falco 0.38.0, a new config key, config_files, allows the user to load additional configuration files to override main config entries. This allows user to keep local customization between Falco upgrades. Its default value points to a new folder, /etc/falco/config.d/ that gets installed by Falco and will be processed to look for local configuration files.
Hot Reload
By default, with the watch_config_files configuration option enabled, Falco automatically monitors changes to configuration and rule files. When these files are modified, Falco will automatically reload the updated configuration without requiring a restart.
If this option is disabled, you can manually restart the Falco systemd service to apply the changes:
systemctl restart falco
Upgrade
apt (Debian/Ubuntu)
If you configured the apt repository by having followed the instructions for Falco 0.27.0 or older, you may need to update the repository URL, otherwise, feel free to ignore this message
sed -i 's,https://dl.bintray.com/falcosecurity/deb,https://download.falco.org/packages/deb,' /etc/apt/sources.list.d/falcosecurity.list
apt-get clean
apt-get -y update
Check in the apt-get update log that https://download.falco.org/packages/deb is present.
If you installed Falco by following the provided instructions:
apt-get --only-upgrade install falco
yum (CentOS/RHEL/Fedora/Amazon Linux)
If you configured the yum repository by having followed the instructions for Falco 0.27.0 or older, you may need to update the repository URL, otherwise, feel free to ignore this message
sed -i 's,https://dl.bintray.com/falcosecurity/rpm,https://download.falco.org/packages/rpm,' /etc/yum.repos.d/falcosecurity.repo
yum clean all
Then check that the falcosecurity-rpm repository is pointing to https://download.falco.org/packages/rpm/:
yum repolist -v falcosecurity-rpm
If you installed Falco by following the provided instructions:
Check for updates:
yum check-updateIf a newer Falco version is available:
yum update falco
zypper (openSUSE)
If you configured the zypper repository by having followed the instructions for Falco 0.27.0 or older, you may need to update the repository URL, otherwise, feel free to ignore this message
sed -i 's,https://dl.bintray.com/falcosecurity/rpm,https://download.falco.org/packages/rpm,' /etc/zypp/repos.d/falcosecurity.repo
zypper refresh
Then check that the falcosecurity-rpm repository is pointing to https://download.falco.org/packages/rpm/:
zypper lr falcosecurity-rpm
If you installed Falco by following the provided instructions:
zypper update falco
Kernel Upgrades
When performing kernel upgrades on your host, a reboot is required. When using a eBPF probe or a Kernel Module driver, the Falco driver loader (i.e., falcoctl driver) should be able to automatically find a pre-built driver (or build it on the fly) corresponding to the updated kernel release (uname -r), making it easy to handle kernel upgrades. The Falco Project features a kernel crawler and automated CI, ensuring you can always obtain the necessary pre-built driver artifact, even for the latest kernel releases we support.
Uninstall
apt (Debian/Ubuntu)
apt-get --purge autoremove falco
yum (CentOS/RHEL/Fedora/Amazon Linux)
yum autoremove falco
zypper (openSUSE)
zypper remove falco
Package signing
On January 18th, 2023 the GPG key used to sign Falco packages has been rotated. Check out the related blog post and make sure you're using the most up-to-date key available at falco.org/repo/falcosecurity-packages.asc.
Most Falco packages available at download.falco.org are provided with a detached signature that can be used to verify that the package information downloaded from the remote repository can be trusted.
The latest trusted public GPG key used for packages signing can be downloaded from falco.org/repo/falcosecurity-packages.asc. The following table lists all the keys employed by the organization currently and in the past, including the revoked ones. We recommend updating the revoked keys to download their revocation certificate, and eventually removing them from your package verification system due to the signature made with them not being trustable anymore.
| Fingerprint | Expiration | Usage | Status | Download |
|---|---|---|---|---|
2005399002D5E8FF59F28CE64021833E14CB7A8D | 2026-01-17 | Signing Falco Packages | Trusted | falcosecurity-14CB7A8D.asc |
15ED05F191E40D74BA47109F9F76B25B3672BA8F | 2023-02-24 | Signing Falco Packages | Revoked | falcosecurity-3672BA8F.asc |
Troubleshooting
This section aims to offer further guidance when something doesn't go as expected in the installation of Falco.
Unable to find a prebuilt driver
ERROR failed: unable to find a prebuilt driver
This error message appears when the falcoctl driver loader tool, which looks for the Falco driver and loads it in memory, is not able to find a pre-built driver, neither as an eBPF probe nor as a kernel module, at the [Falco driver repository] (https://download.falco.org).
You can easily browse and search the supported targets at download.falco.org/driver/site.
This means that there's no prebuilt driver available for the kernel running on the machine where Falco is going to be installed.
However, you can add your kernel release version to the build grid the pipeline refers to building the drivers. Follow this tutorial to contribute the required configuration.
Enable the BPF JIT Compiler
If you are using the eBPF probe, in order to ensure that performance is not degraded, make sure that:
- Your kernel has
CONFIG_BPF_JITenabled net.core.bpf_jit_enableis set to 1 (enable the BPF JIT Compiler)
This can be verified via sysctl -n net.core.bpf_jit_enable.
Was this page helpful?
Let us know! You feedback will help us to improve the content and to stay in touch with our users.
Glad to hear it! Please tell us how we can improve.
Sorry to hear that. Please tell us how we can improve.
